Deploying an Azure WebJob via VSTS without deleting existing WebJobs

The scenario:
I have an Azure App Service that is hosting 5 different WebJobs. I have configured a release on Visual Studio Team Services (VSTS) to deploy each WebJob to Azure, independently from each other.

The problem:
Deploying a WebJob deletes the other WebJobs that were already deployed!!!

Solution:
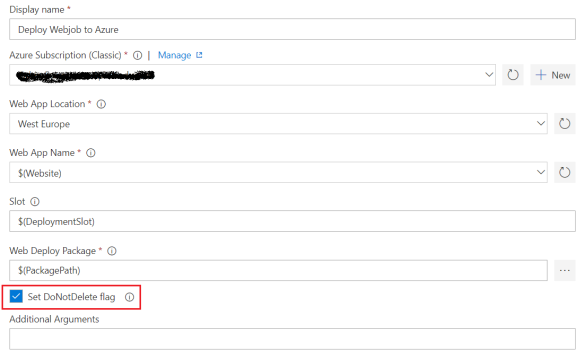
Tick the “Set DoNotDelete flag” – current files/folders in the App Service in will be preserved while publishing website.

deploy-webjob.png

Disabling ‘member is obsolete’ warnings on Visual Studio Team Services

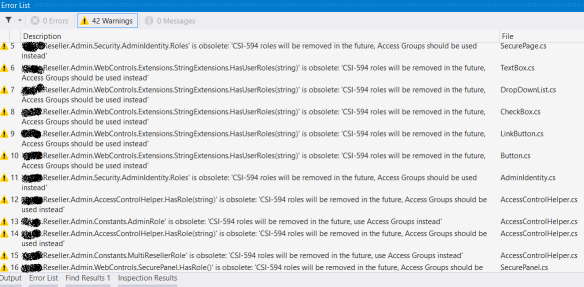
The scenario – I am working on a new functionality solution that has many members marked as Obsolete (some are not being used at the moment and others will be removed in the future). When the solution is compiled warnings are being generated as follows:
01-vstudio-warnings

And this is how things are supposed to work – other developers working in the same solution will know straight away that these members should not be used. It’s perfectly fine to diplay these warnings locally, but honestly I don’t think it makes sense to display them on the build server.

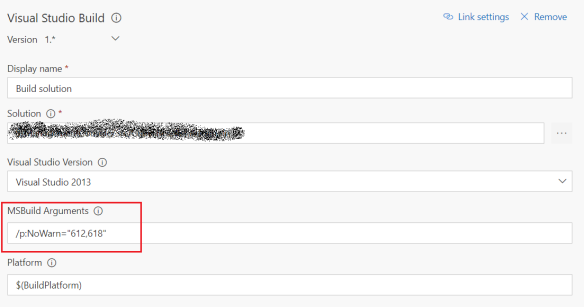
MSbuild has a property named nowarn that can be used to suppress compiler warnings. In my case, I want to suppress warnings CS0612 (‘member’ is obsolete) and CS0618 (‘member’ is obsolete: ‘text’).

In VSTS add the following to the MSBuild arguments to your Visual Studio Build task:

/p:NoWarn=”612,618″

02-build-task.png

That’s it! No more ‘member’ is obsolete warnings will be displayed when running a new build. Remember to add the same arguments to other tasks that might use MSBuild (for example, I have another task that generates an ASP.NET deployment package which was generating the same warnings).

Happy coding!

MSBuild – Access to the path is denied

The problem:

I was configuring a new build on Bamboo CI server for a ASP.NET application. The solution built locally just fine, but consistently failed on the build server. This was the error:

(BeforeBuild target) -> 
  C:\Bamboo\src\MC-BUILD-JOB1\MyProject.Web\MyProject.Web.csproj(1851,5):
 error : Could not write Destination file: 
Access to the path 'C:\Bamboo\src\MC-BUILD-JOB1\MyProject.Web\Config\AppSettings.config' is denied.

The problem was in the following line:

<TransformXml Source="Config\AppSettings.Base.config" 
              Transform="Config\AppSettings.$(Configuration).config" 
              Destination="Config\AppSettings.config" />

So basically the TransformXml task was failing because the file Config\AppSettings.config was checked out as read-only in the build server.

Fortunately there is an easy workaround. The trick is to apply the XML transformations to a temp file and then use the Copy task with the OverwriteReadOnlyFiles attribute set to “True” to overwrite the file Config\AppSettings.config:

<TransformXml Source="Config\AppSettings.Base.config" 
              Transform="Config\AppSettings.$(Configuration).config" 
              Destination="Config\AppSettings_temp.config" />
<Copy SourceFiles="Config\AppSettings_temp.config" 
      DestinationFiles="Config\AppSettings.config" 
      OverwriteReadOnlyFiles="True" />
<Delete Files="Config\AppSettings_temp.config" />
Using build events to create nuget packages

In this post I’ll show you how to automate the creation of nuget packages using Build Events in Visual Studio.

Table of contents

The Problem

You want to create a nuget package for a class library in order to use it in different applications. You want to execute this task every time you build the project/solution.

The solution

In short, you need to create a .nuspec file for the project and then use a Post-Build Event Command Line to create the package.

For demonstration purposes I created a small class library project that contains my XmlSerializer class. I’ll show you step by step how to create a nuget package for that project.

Continue reading