Configuration settings and tests in a Continuous Delivery world

Today I’ll write about an anti-pattern that I see quite often, regarding the usage of configuration settings. Settings stored in configuration files such as web.config or app.config are a dependency that should be abstracted in order to make your code more flexible and testable!

In this article I’ll show you:

  • Some of the problems of using the configuration settings
  • How to refactor your code in order to make it more testable
  • How to refactor your tests in order to make them CI/CD friendly

The problem – testing code that uses configuration settings

Let’s suppose you are creating a service class that uses a 3rd party REST API. API’s username, password and endpoint are stored in the configuration file as follows:

<appSettings>
    <add key="myApi.Username" value="myusername" />
    <add key="myApi.Password" value="mypassword" />
    <add key="myApi.Endpoint" value="https://www.myapi.com/v1" />
</appSettings>

Consider the following code:

public class FooService
{
	private readonly string _myApiUsername;
	private readonly string _myApiPassword;
	private readonly string _myApiEndpoint;

	public FooService()
	{
		_myApiUsername = GetConfigValue("myApi.Username");
		_myApiPassword = GetConfigValue("myApi.Password");
		_myApiEndpoint = GetConfigValue("myApi.Endpoint");
	}

	private string GetConfigValue(string key)
	{
		string value = ConfigurationManager.AppSettings[key];

		if (string.IsNullOrWhiteSpace(value))
		{
			string message = $"Could not find AppSettings[\"{key}\"]!";
			throw new InvalidOperationException(message);
		}

		return value;
	}

	// code omitted for brevity
}

The first problem comes when you try to write some unit tests for this class. Using this approach will force you to have a configuration file in your unit test project, which is not a big deal.

What if you needed to use different values to test other scenarios, such as testing if an InvalidOperationException is thrown when the username, password or endpoint are null or whitespace? You’d have to find a way to override the AppSettings section of the configuration file (ugly stuff, trust me). I’ll show you next how to refactor the code to make it more testable.

Making the code unit-test friendly

Please note that this is not the best solution but just the first step to make your code more testable. This is ideal for people that, for some reason, cannot spend much time refactoring the code.

The trick is to change the constructor to take an optional NameValueCollection parameter. If this parameter is not set then it will try to get the values from the configuration file (using the ConfigurationManager.AppSettings object):

public class FooService
{
    private readonly NameValueCollection _appSettings;

    private readonly string _myApiUsername;
    private readonly string _myApiPassword;
    private readonly string _myApiEndpoint;

    public FooService(NameValueCollection appSettings = null)
    {
        _appSettings = appSettings ?? ConfigurationManager.AppSettings;

        _myApiUsername = GetConfigValue("myApi.Username");
        _myApiPassword = GetConfigValue("myApi.Password");
        _myApiEndpoint = GetConfigValue("myApi.Endpoint");
    }

    private string GetConfigValue(string key)
    {
        string value = _appSettings[key];

        if (string.IsNullOrWhiteSpace(value))
        {
            string message = $"Could not find AppSettings[\"{key}\"]!";
            throw new InvalidOperationException(message);
        }

        return value;
    }

    // service methods go here
}

Setting the values in a unit test is easy:

// arrange 
var settings = new NameValueCollection {
    {"myApi.Username", "myusername"},
    {"myApi.Password", "mypassword"},
    {"myApi.Endpoint", "myendpoint"}
};

var service = new FooService(settings);

// act
// ....

// assert
// ....

Another example – testing if an exception is thrown when the username is empty:

// arrange 
var settings = new NameValueCollection {
    {"myApi.Username", ""},
    {"myApi.Password", "mypassword"},
    {"myApi.Endpoint", "myendpoint"}
};

FooService service = null;

// act/ assert
Assert.Throws<InvalidOperationException>(() => {
    service = new FooService(settings);
});

Code is now testable, cool! I am now able to use different settings and run tests on my machine (“it works on my machine”, hurray!). But this is not good enough!

Making the code testable and CI/CD friendly

The previous refactoring is a very quick way to make code testable, but it can be improved in terms of testability and readability. The first thing I don’t like is the usage of a NameValueCollection object that contains the settings, I’d rather define an interface and a class like these ones:

public interface IApiSettings
{
    string MyApiEndpoint { get; }
    string MyApiPassword { get; }
    string MyApiUsername { get; }
}

public class ApiSettings : IApiSettings
{
    public string MyApiUsername { get; }
    public string MyApiPassword { get; }
    public string MyApiEndpoint { get; }


    public ApiSettings(string myApiUsername, string myApiPassword, string myApiEndpoint)
    {
        if (string.IsNullOrWhiteSpace(myApiUsername))
        {
            throw new ArgumentException("Username cannot be null or whitespace.", nameof(myApiUsername));
        }

        if (string.IsNullOrWhiteSpace(myApiPassword))
        {
            throw new ArgumentException("Password cannot be null or whitespace.", nameof(myApiPassword));
        }

        if (string.IsNullOrWhiteSpace(myApiEndpoint))
        {
            throw new ArgumentException("Endpoint cannot be null or whitespace.", nameof(myApiEndpoint));
        }

        MyApiUsername = myApiUsername;
        MyApiPassword = myApiPassword;
        MyApiEndpoint = myApiEndpoint;
    }
}

Refactoring FooService, one more time:

public class FooService
{
    private readonly IApiSettings _settings;

    public FooService(IApiSettings settings)
    {
        _settings = settings ?? throw new ArgumentNullException(nameof(settings));
    }

    // service methods go here
}

Now let’s talk again about the tests – things are a bit different when we’re running tests in a build or deployment pipeline, comparing to our local machine.

Different environments will have different configuration settings (connection strings, API endpoints, etc) so it’s extremely important to know what is the current environment and load the corresponding settings.

Also, where do we store these settings? We have at least these options:

  • Create one configuration file per environment
  • Configure environment variables per environment

It’s probably easier to use configuration files locally, what about the build/deployment pipeline? Using the configuration files might be an option for some environments but not for others such as Production (for security reasons). These settings can be set (manually or dynamically) using environment variables in the build/deployment pipeline.

I have used the following approach that works for both scenarios:

  • if the environment variable exists then use it
  • otherwise, use the value from the configuration file

Just to be completely clear, the environment variable takes precedence over the setting from the configuration file. I have created an helper class that will be used to get the right values to be used in the tests, according to the approach above:

public static class ConfigurationHelper
{
    public static string GetEnvironmentOrConfigValue(string key, string defaultValue = null)
    {
        if (string.IsNullOrWhiteSpace(key))
        {
            throw new ArgumentException("Value cannot be null or whitespace.", nameof(key));
        }

        string value = GetEnvironmentValue(key);

        if (!string.IsNullOrWhiteSpace(value))
        {
            return value;
        }

        value = GetConfigValue(key);

        if (!string.IsNullOrWhiteSpace(value))
        {
            return value;
        }

        return defaultValue;
    }

    private static string GetConfigValue(string key)
    {
        string value = ConfigurationManager.AppSettings[key];

        return value;
    }

    private static string GetEnvironmentValue(string key)
    {
        string variableName = string.Concat("appSettings_", key.Replace(".", "_"));
        string value = Environment.GetEnvironmentVariable(variableName);

        return value;
    }

Refactoring the tests:

// arrange
var username = ConfigurationHelper.GetEnvironmentOrConfigValue("myApi.Username");
var password = ConfigurationHelper.GetEnvironmentOrConfigValue("myApi.Password");
var endpoint = ConfigurationHelper.GetEnvironmentOrConfigValue("myApi.Endpoint");

var settings = new ApiSettings(username, password, endpoint);
var service = new FooService(settings);

// act
// ....

// assert
// ....

A quick note – you can have the same names for both the appSettings and the environment variables or follow a naming convention. In my example above, configuration setting “myApi.Username” would correspond to the environment variable “appSettings_myApi_Username“. You can use any convention you want.

So, for the following configuration settings

<appSettings>
    <add key="myApi.Username" value="myusername" />
    <add key="myApi.Password" value="mypassword" />
    <add key="myApi.Endpoint" value="https://www.myapi.com/v1" />
</appSettings>

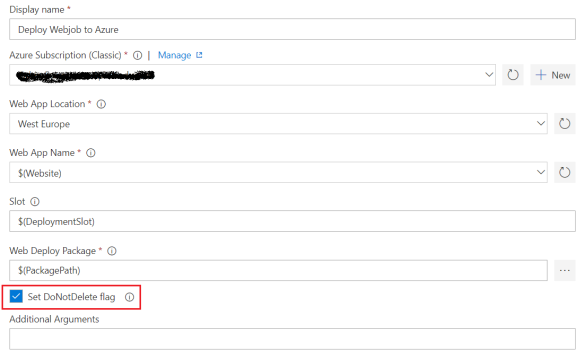
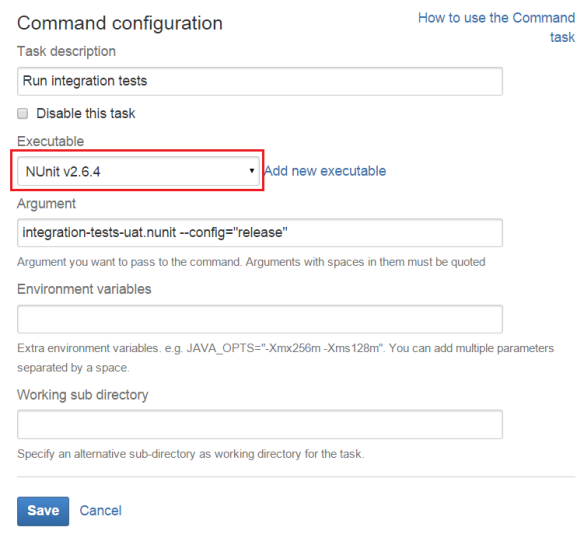
I’d need to configure the corresponding environment variables in the build server, for each environment. Something like this:

vsts_env_variables

(Please note that this screenshot was taken from a demo release definition I created in Visual Studio Team Services (VSTS) that contains 3 environments: QA, UAT, Production).

That’s it! When the tests are run in the build server they will use the environment variables values defined above. Another good thing of this approach is that you can use both values from the configuration file and the environment variables in the build server.

Happy coding!

On smoke tests

So you have configured a new build for your ASP.NET application: the source code compiles without errors, there are no unit tests failing, the deployment package is generated and published as an artifact – great! Now it’s time to deploy it. Everything seems to be fine (no errors logged), but when you try to run your application you get an YSOD like this one:

ysod1
There are many things that can go wrong with a deployment, so it is important to configure your deployment pipeline to verify that the deployment itself was successful. You can do it by using smoke tests.

Continue reading

Deploying an Azure WebJob via VSTS without deleting existing WebJobs

The scenario:
I have an Azure App Service that is hosting 5 different WebJobs. I have configured a release on Visual Studio Team Services (VSTS) to deploy each WebJob to Azure, independently from each other.

The problem:
Deploying a WebJob deletes the other WebJobs that were already deployed!!!

Solution:
Tick the “Set DoNotDelete flag” – current files/folders in the App Service in will be preserved while publishing website.

deploy-webjob.png

Testing Service Fabric deployment packages on VSTS

The scenario – you have a Service Fabric build configured on Visual Studio Team Services (VSTS) as follows:

01-sf-build-configuration

As you can see from the screenshot, there is a task to generate the Service Fabric deployment package. There were no errors in this task, but don’t assume that everything is OK with the package, something might go wrong when you try to deploy it to a SF cluster.

In order to avoid surprises when deploying the application, you can test the package after its generation using the Test-ServiceFabricApplicationPackage powershell cmdlet.

Add a new Powershell++ task after generating the package and configure it as follows:
01-test-sf-package-task

The command takes the path to the SF package folder as a parameter. I usually set the SF project as the working folder.

Queuing a new build, you can see the results of the build and in particular the task that tests the SF package:

03-build-results

That’s it! With this solution you will know immediately if something is wrong with the package, saving you from the frustration of a failed deployment. This doesn’t mean that deployments will never fail, but hopefully you will be able to detect most or all of the errors in the deployment package every time you trigger a new build 🙂

Improving the performance of Service Fabric builds and deployments on VSTS

Consider the following definition – this is my typical build for a Service Fabric (SF) application on Visual Studio Team Services (VSTS):

001-typical-build-definition

In short, after restoring the nuget packages, building the solution and running the unit tests I generate the Service Fabric deployment package and test it. The artifacts of the build are not only the deployment package but also the publish profiles for each environment, as follows:

002-typical-build-artifacts

Unlike an ASP.NET application the Service Fabric deployment package is not zipped, as you can see in the above screenshot. Publishing the artifacts in this case takes around 11 seconds:

003-typical-build-timeline

What does it mean exactly “publishing the artifacts”? It means that the files files will be uploaded to the server. Obviously the more and bigger files you have the longer it will take to upload them to a server (and later on downloading them when you need to deploy the application).

I decided to zip the deployment package instead to improve the performance. I added another task as follows:

004-zip-task

And this is the deployment package, zipped:

005-zip-build-artifacts

Zipping and uploading the deployment package took around 8 seconds:

006-zip-build-timeline

You might think that’s not a big improvement but times will change depending on the size of the deployment packages. In this case the generated folder has 26MB but I’ve heard of deployment packages that have almost 200MB in size!

Also, have in consideration that when you do a deployment you’ll need to download the artifacts from the server. In the first case the deployment package (uncompressed) took on average 10 seconds to download:

007-typical-release

As opposed to less than 3 seconds in the second case (zipped deployment package):

008-zip-release

That’s it! In this example I have shown you a Service Fabric build but I’d recommend this approach if you upload multiple files as artifacts. Even though there are extra tasks in the build (zip the package) and release (unzip the package) there was an improvement in the performance of both the build and release.

My suggestion is to create 2 versions of the same build and also the release and compare the results between each version. Give it a try, you might be surprised with the result!

Happy coding 🙂

Powershell scripts running on Bamboo don’t return the correct exit code

As part of an deployment project on Bamboo CI, I was running a powershell script to deploy an ASP.NET application to a Cloud Service on Azure.

Even though there was an error executing the script, Bamboo was setting the status of the Deployment to Success. Why? Because the exit code returned by the powershell script is always 0 (zero means successful execution).

After some research I was able to find a way to return the correct exit code in case of failure. I added the following lines to the top of my powershell script:

trap
{
    write-output $_
    exit 1
}

The trap statement includes a list of statements to run when a terminating error occurs – in this case, every time an error occurs the error message will be displayed and then the script will return a correct exit code indicating a failure. I am returning 1 but any value different from 0 (zero) will do the trick 🙂

Running tests in Bamboo after a deployment

I’ve been using Bamboo CI Server for the last few months to automate builds and deployments. I like the tool because it has good integration with Jira (both tools are from Atlassian), it’s easy enough to configure new builds and deployments, triggers, notifications, etc.

But I realised that something important was missing: Bamboo allows you to add a test runner task in a build project but not in a deployment project! This means that you can’t run tests after a successful deployment (smoke tests, integration tests, …), at least not without a workaround.

The trick is to configure your test runner as an executable in Bamboo. These are the steps in order to configure NUnit and run tests in a deployment project (it should work for any other test runner):


1. Add a new executable for NUnit

Go to Bamboo Administration and click on “Executables” on the left panel.

01 bamboo administration

Click on “add an executable as a server capability

02 click link

Add the path to NUnit Console and a label for the new executable. It is important to set the type to “Command” in order to use it in a Deployment project:

03 add-executable

Click on the “Add” button to save the new command.


2. Add a new deployment task to run the tests

You can either add a new task for the tests to an existing deployment or add a new deployment project that will only run the tests.

I decided to add a new deployment project that will be triggered after a successful deployment because it’s easier to understand if there is actually a problem with the deployment itself or if the integration tests are failing. Also, this way I am able to run the tests at any time without having to deploy the application.

Whatever your choice is, add a new “Command” task to the deployment project:

04 - add-new-task

In the “Executable” dropdown you should be able to find the command you configured for NUnit. Add arguments and environment variables if necessary:

06 - configure-nunit-task

Save the task and run the deployment. This is an excerpt of the generated log that contains the test results:


NUnit-Console version 2.6.4.14350
Copyright (C) 2002-2012 Charlie Poole.
Copyright (C) 2002-2004 James W. Newkirk, Michael C. Two, Alexei A. Vorontsov.
Copyright (C) 2000-2002 Philip Craig.
All Rights Reserved.

Runtime Environment - 
   OS Version: Microsoft Windows NT 6.2.9200.0
  CLR Version: 2.0.50727.8009 ( Net 3.5 )

ProcessModel: Default    DomainUsage: Default
Execution Runtime: net-4.0
..F.F.F.F
Tests run: 5, Errors: 0, Failures: 4, Inconclusive: 0, Time: 6.8491962 seconds
  Not run: 0, Invalid: 0, Ignored: 0, Skipped: 0

Errors and Failures:
1) Test Failure : GivenAnUrl_WhenGettingPage_ShouldreturnSuccessStatusCode("/Home.aspx")
     Expected: True
  But was:  False

2) Test Failure : GivenAnUrl_WhenGettingPage_ShouldreturnSuccessStatusCode("/Services/Activate.aspx")
     Expected: True
  But was:  False

3) Test Failure : GivenAnUrl_WhenGettingPage_ShouldreturnSuccessStatusCode("/Administration/LostPassword.aspx")
     Expected: True
  But was:  False

4) Test Failure : GivenAnUrl_WhenGettingPage_ShouldreturnSuccessStatusCode("/Shop/Product/List.aspx")
     Expected: True
  But was:  False

Failing task since return code of [C:\Program Files (x86)\NUnit 2.6.4\bin\nunit-console.exe integration-tests-uat.nunit --config="release"] was 4 while expected 0
Finished task 'Run integration tests' with result: Failed
Finalising the build...
Stopping timer.
Build 12484609-16973828-16613398 completed.
Finished processing deployment result Deployment of 'release-16' on 'UAT - Integration Tests'

That’s it! The output is not nicely formatted as in the build tasks but it does the job – you can see how many tests were run and how many have failed (if any).

Managing deployments to Azure

 The scenario – I am working on an ASP.NET web site that is hosted on Azure as a Cloud Service.

I have automated both the build and the deployment to the cloud using the Bamboo build server. The build compiles the solution, runs the unit tests and generates the deployment packages that are used by Bamboo to deploy the site to Azure.

I could use Bamboo to manage all deployments but given that Cloud Services offer out-of-the-box support for blue-green deployments I decided to take advantage of both systems. This is how I have organised things:

1. Deployment to Staging

Deployment to Staging is performed by Bamboo. Automated tests are executed as part of the deployment to check if everything is working as expected. Additional manual tests should be executed as well before deploying to Production.

bamboo-to-cloud-service

2. Deployment to Production

This is done using the Azure Management Portal – simply click on the Swap button and traffic will be routed to the Staging environment, which now becomes the Production environment.

swap-to-production

3. Rolling Back

Something went wrong? No problem, click on the Swap button again to switch the environments – it’s just as simple as that.

rollback-deployment

Final thoughts

Azure Web Sites or Cloud Services offer out-of-the-box support for blue-green deployments, which provide a simple and powerful way to test a deployment before going to production and roll it back, if necessary.

You can use your Continuous Delivery server in conjunction with Azure Management Portal to manage your deployments to the cloud – consider all the advantages and disadvantages and use the functionalities of each system that makes your life easier 🙂